
Joel Crane presented at WLPC Phoenix 2018 on how to quickly apply filters without having to memorize regular expressions, create coloring rules to track 802.11 exchanges and build custom configuration profiles.
When Presenting with the iPad
The first thing we need to do is set up a keynote remote. Go to <Preferences>, <Remotes>, and then <Add>.

However, by default, if you have paired this with Bluetooth, it’s going to use Bluetooth, so be careful and turn it off. Client isolation isn’t enabled there. They could see each other and it worked pretty much flawlessly. The next piece of this is in the keynote on the iPad. There’s a little bit of a delay when you’re using Bluetooth , but with 5GHz Wi-Fi, it’s pretty quick.
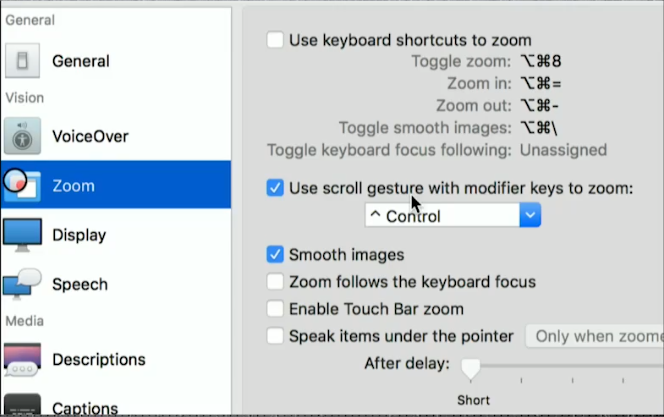
The last thing that I want to show is Zoom controls in Mac OS – Go to <Preferences>, <Accessibility>, <Zoom>, then check <Use scroll gesture with modifier keys to zoom>.
Filtering and Coloring Frames with Wireshark
It’s pretty important because when you look at Wireshark, you basically get this giant wall of packets. Using Wireshark and then coming up with regular expressions really scared me because I thought that you just had to memorize all of these.
I thought you had to know all these expressions and know exactly what to type in the filters bar, but it turns out that it’s not true.
A couple of quick things to know first is our operators. You can take two regular expressions and put them together to do various things. For example, you want to show all of the data frames that have retries, then you just use data frames and retries and they’ll match those two together. It’ll only show if both of those things are present in the frame.

Three ways on how to apply filters in Ekahau:
- If you right-click on something in a frame and hit apply as a filter, it puts it up in the filter bar and it applies it right away.
- If you hit prepare as a filter and it puts the thing in the filter bar, but it doesn’t hit apply, you can put it up there and then work on it a little bit more before you apply it.
- If you use colorized with filter, it’s going to take you to the coloring rules window.
How To Do It?
The first thing to do is make a packet capture real quick, then disassociate from the Wi-Fi. Airtool is going to open up Wireshark automatically because I configured it to do that.
What we need to do is apply some basic colors here to make this easier to read.
- Apply some filters at the frame type level. -Right-click on <bar down> down to the IEEE 802.11 information.
- Go to the frame control field and we can see that this is a control frame., right click on it and then hit <colorize with filter> and click <new coloring rule>.
That will open up the coloring rules window. This is where we can define everything that we need to about this rule.
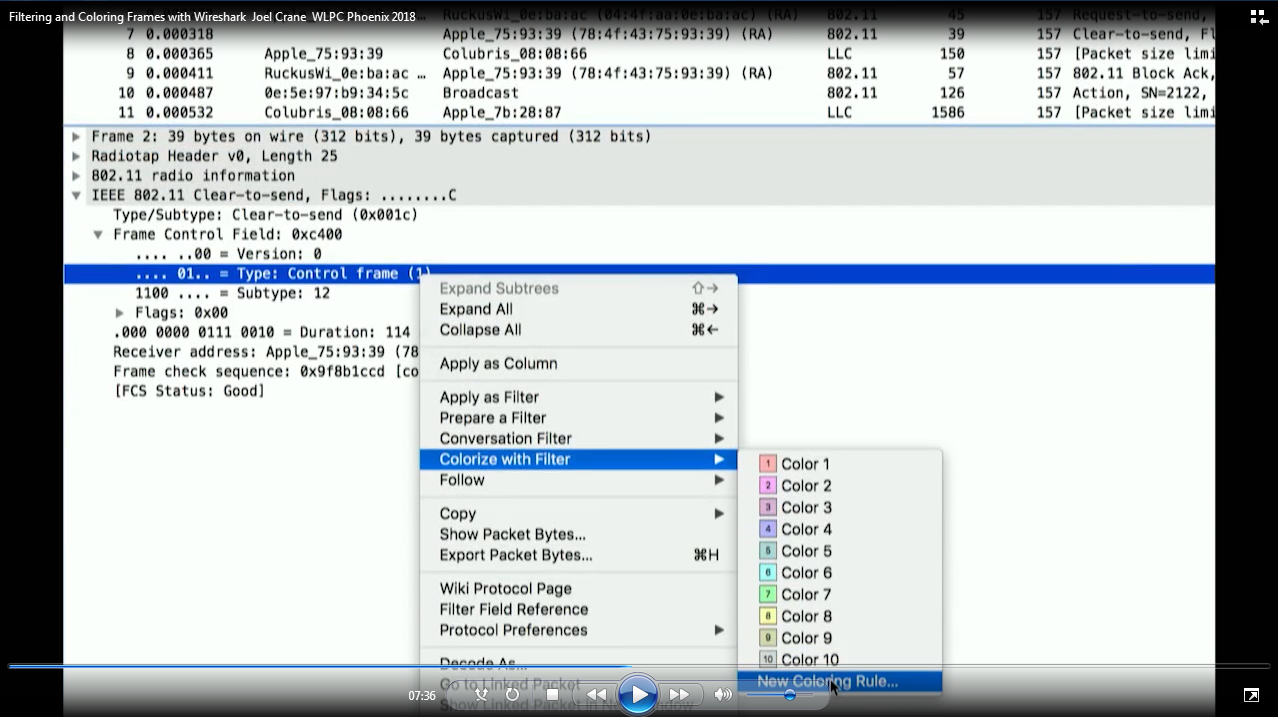
We can see that the regular expression has already been applied there. We don’t have to worry about remembering that. It’s there already so we didn’t have to type anything.
- Apply <color>change the foreground to white or snow, then change the background to tangerine. We get a nice orange color.
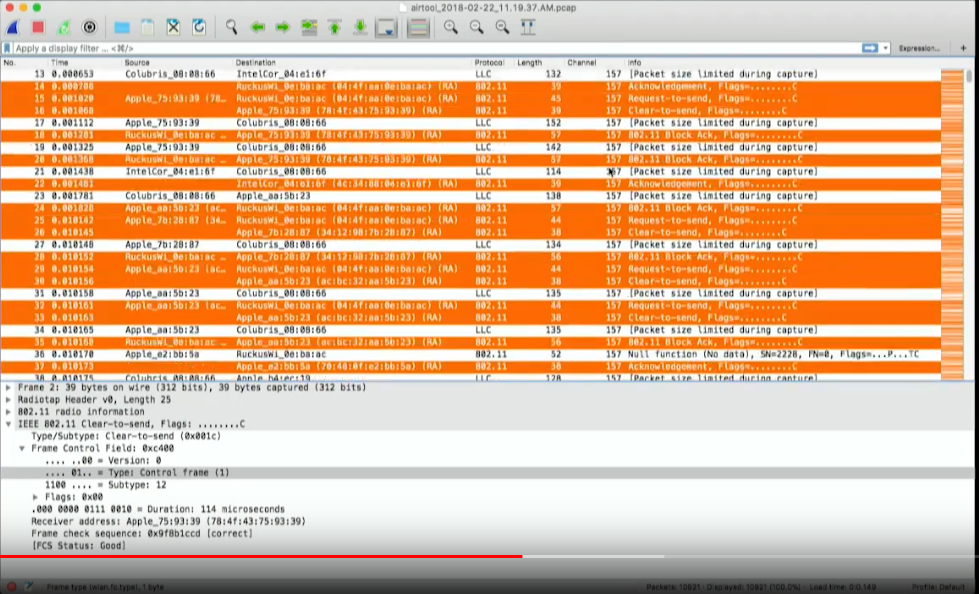
- Find a data frame. Go to <colorize a filter>, click <new coloring rule> and we’ll call it a data frame. Make the foreground white and the background blue.

- Select management frame. Go to <management frame>, <Coloring with filter>, <New coloring rule> and change the foreground into white and the background to purple.

Now we’ve got all of our different frames all colored here. We can see all of our different management frames.
What if we want to apply slightly different colors for each different type of frame?
Instead of just applying a control frame, go to the subtype field and right click, then go to <colorize with filter>.

- Once again, white background and then select orange and grab a slightly different hue of orange there.
- If we go up to the <View menu> coloring rules, then notice that these are ordered in a specific way.
That is really important the ones that are on top get applied first.
What if we want to call out the difference between retries and first attempt frames?
- Find one that is a retry, then filtered down to all the retries.
- If I click on the other way and if we looked inside the frame, right click and hit prepare as a filter. That puts it up in the top.
- Make foreground color that will give the background blue.
How to Add a New Column that will Show the Frame Type?
- Find <Coloring Rule Name>, right-click on that and apply this as a column.

Now, we’ve got this column that shows us nice and neat frame names. That column is not designed at all to show us what type of frame it is.
- You can add buttons. If you want to show a specific frame type, we can add this as a filter.
- Add this as a filter and we could call this data frames.
- Put the label – data frames.
- We’ve given the filter from our data frame.
- Click OK and we get a button up.

We’re only looking at data frames.
- You can use that to filter out bad frames
- Only show data frames
- Show management frames
- Show control frames
- And anything you want
Just by going and looking in the packet and right clicking prepares filter and taking it up there to the top. You already have a really nice color. Your profile is ready to go and got all the buttons built in.

Joel Crane is a Sales Engineer and a part-time Technical Trainer at Ekahau. He spends a lot of his time talking to customers on the phone. If you have more questions or feedback, connect with Joel via twitter.
